< | Help Index | >

|
Production Testing
|
Production Test Mode
Production testing allows you to test a number of Keypads, logging the
results for each part. In order to test Keypads you must be in the
Production Test mode. Select "Production Test" from the "File"
menu.
Starting A New Job
Testing of Keypads is performed as part of a "job". Each job has an associated job number, lot number, operator (the
person doing the testing) and quantity of tested good Keypads required.
To begin a job, open a Keypad File while in Production Test mode. To open a file double click on the file
name in the file browser on the left of the main window or select "Open..." from the "File" menu.
There is also an "Open Special..." item in the "File" menu. When using
this you will have the option of opening a file with all of the LED items
converted to switches. This allows the testing of membrane circuits before the LEDs have been installed. Note the actual Keypad File is not changed. The
values set in the Defaults tab of the Edit
Info window will be used when creating the switches.
If a file is already open, be sure "Production Test" is checked in the "File" menu.
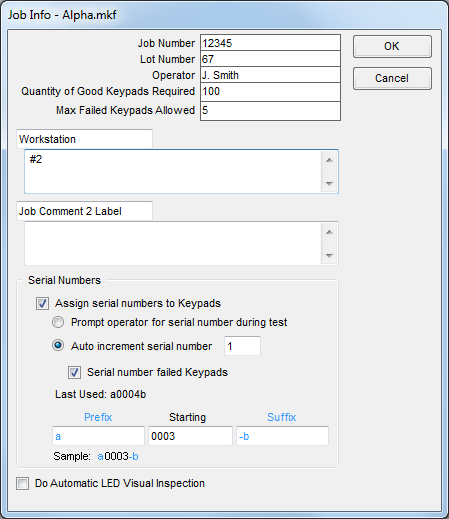
With a Keypad File open, click the "Begin Job" button. The Job Info window, where you
enter information about the job you are about to begin, will open.
|
- Job Number, Lot Number and Operator
-
These fields are saved as part of the job logs. The Job and Lot Numbers are also used as the
default file names for job logs.
- Quantity of Good Keypads Required
-
Entering a number will allow the Mistral to show you how many more good Keypads you need
while testing. The number of passed and failed parts is always tracked, even if you don't enter
a number in this field.
- Max Failed Keypads Allowed
-
Entering a number will allow the Mistral to show you how many more failed keypads remain before
testing stops. The number of passed and failed parts is always tracked, even if you don't enter
a number in this field.
- Comment Labels and Comments
-
These fields allow you to enter comments that will appear in the
job logs. These fields are also saved in the Keypad File when a job
is completed so they will be there the next time you open the file
for testing. Use the label to identify what is in the comment field or
to prompt the operator for information to
enter in the comment before testing. If you leave both the
label and the comment blank, these fields will not appear in the job
logs.
- Serial Numbers
-
This section allows you to specify serial numbers that will appear in the detailed
job log. The serial number can also be used on a label if label printing is enabled (see Labels for
more information). If you use a label that displays either a serial number or a barcode, you must select this option to continue.
- Assign serial numbers to Keypad
-
Check this box if you would like to use serial numbers for logging or
labeling. When checked, the fields below will be enabled.
- Prompt operator for serial number during test
-
If this option is selected, the operator will be prompted
to enter a serial number before each part is tested. Use
this method if the parts being tested already have serial
numbers and they are not being tested in sequential order. You
can also use this option with a bar code reader to enter a keypad's
bar coded serial number into the Mistral software.
Note: The
Prefix and Suffix fields apply to this option. You can use them
to save typing if most of the serial number is the same for all
Keypads. See below for more information.
- Auto increment serial number by X
-
Select this option if you will be applying serial
numbers to the Keypads while testing or if the Keypads
already have serial numbers and they will be tested in
sequential order. Enter the number the Starting Number
should increment by each time.
- Serial number failed Keypads
-
If failed Keypads will also have serial numbers, check this box.
-
Prefix, Starting Number and Suffix
-
Enter an optional Prefix and/or Suffix for the serial
number sequence. These will be added to the auto
incrementing or prompted Starting Number portion of the
serial number. For example if you are testing parts with
serial numbers starting at "800-0001-A", set the Prefix
to "800-" and make the Suffix field "-A".
For auto incrementing serial numbers, set the
Starting Number field to first value for the
incrementing portion of the serial number. In the
example above this would be "0001". Note that leading
zeros in the Starting Number field can be used to give
all serial numbers the same number of digits. Using the
above example, the first serial number will be
"800-0001-A" and the tenth auto generated serial number
will be "800-0010-A".
-
Do Automatic LED Inspection
-
See Automatic LED Visual Inspection for more information.
|
When you have finished with the Job Info window click "OK" to begin the job or "Cancel" to stop.
Testing Keypads
To test a part, connect a Keypad to the pod. It must always be connected the same way as it was when the Keypad File was defined,
either when it was learned automatically or created manually.
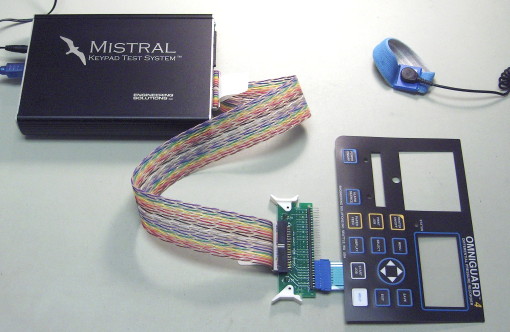
Click "Test First Keypad" (or "Test Next Keypad") to begin testing the connected keypad.
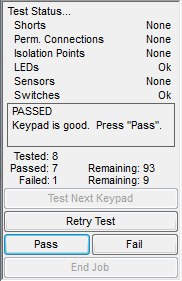
Each time a new keypad is tested the Mistral begins by scanning for shorts between all points used by
the Keypad File, including any isolation points. The LED on the front panel will flash red (or the right LED will turn red if there
are two LEDs on the panel) while this
scan is being done. If a short is found the pod emits a warbling sound and the error is displayed.
After looking for shorts the Mistral checks the permanent connections. If a permanent connection
is good, the connection's item turns green. If it is bad the item turns red and the pod emits a warbling sound.
If continuous electrical testing of permanent connections is enabled, the Mistral will
continue to electrically the good connections until you click on one of the permanent connection items or
press the space bar. If an permanent connection fails during this test the corresponding item
will turn red.
Once the permanent connections have been tested the Mistral checks the LEDs. If
an LED is not found or installed backwards, the corresponding LED item will turn
red.
The Mistral next measures the forward voltage across each LED and displays
the result in the LED item. If the voltage is less than the minimum or greater
than the maximum allowed, the LED item will turn red. LED reverse leakage is also
checked at this time and if it is too high the corresponding item turns red. If any of the LEDs are
found to be bad the pod emits a warbling sound
If continuous electrical testing of LEDs is enabled, the Mistral will
continue to electrically test LEDs until you click on one of the LED items or
press the space bar. If an LED fails during this test the corresponding item
will turn red.
If LED illumination is enabled, the LEDs found are lit one at a time or in
sequence depending on the "LED Test Mode" setting (see Testing tab in the Edit Info window
for more information). You will be prompted to click on the LED item to confirm
it is lit.
Warning: If the file contains any series LED items, the operator
MUST confirm that the LEDs illuminate since the Mistral may not be able to
test them electrically.
After an LED has been illuminated the corresponding
LED item will turn green.
Tip: You can press the space bar to confirm an LED
is on. To set the order that LEDs are illuminated use the Set Test Sequence tool when editing the
file.
If the keypad contains any light sensors, the operator will be prompted to cover each one
to measure the dark current. When the current is below the maximum dark current the operator
will be asked to uncover the sensor to measure the light current. If the sensor does not work
properly the operator can press the "Esc" key to skip it or click the "Fail" button to
end the test.
After completing any sensor tests, the LED on the front panel will flash red (or the right LED will turn green or orange if there
are two LEDs on the panel) and the Mistral will begin scanning for switches. If "Switches
must be pressed in sequence" was selected, you must press the switch
corresponding to the item flashing on the screen otherwise you may press the
switches in any order (see Edit Info window for
more information). As you press each switch on the Keypad the pod will beep and
the corresponding switch item on the PC screen will turn yellow (or red) and
display the switch resistance, or the forward voltage for switched diodes and
switched LEDs. When the switch is released the corresponding
switch item will turn green if the switch is good or red if there is a problem.
You may press the switch to test it again if you are not required to press
switches in sequence. If you are testing in sequence, you can press the "Esc" key
to skip a switch and after all switches have been tested once, the sequence
starts over.
Tip: To set the test order when testing switches in sequence use
the Set Test Sequence tool when editing the
file.
To find out why an item is red, position the mouse pointer over it. A box will pop up telling you what
the problem was.
Once all the items are tested and green click the "Pass" button. If any of the items
are red or you find some other reason to fail the part even though it tested good
(printing error, etc.), you have the option of either running the test again by clicking
on "Retry Test" or failing the Keypad by clicking on "Fail".
Tip: Once again you can
choose "Pass" or "Fail" with the space bar depending on whether the Keypad is good or
bad.
If you fail a part, you will be prompted to enter any additional information about what
is wrong. This information will be saved in the Detailed Job Log (see below). You may see
additional messages or be required to enter a password if Pass/Fail Options were
set.
Tip: If a password is not required, you can dismiss the comment window by pressing
the space bar.
Once you have passed or failed the Keypad, disconnect it, connect the next Keypad
to test and click "Test Next Keypad". If you would like to test the same part again, press
"Retry Test". Tip: Again, hitting the space bar will select "Test Next Keypad".
While testing, a Job Snapshot showing the results for the last 100 Keypads tested
can be displayed at the bottom of the window by selecting "Show Job Snapshot" from the "File" menu.
You can resize the snapshot by clicking and dragging on the bar immediately above the snapshot grid.

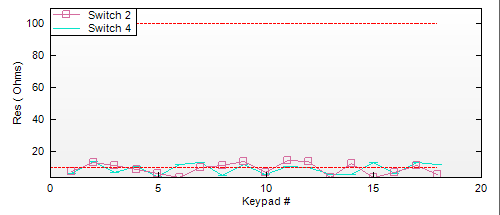
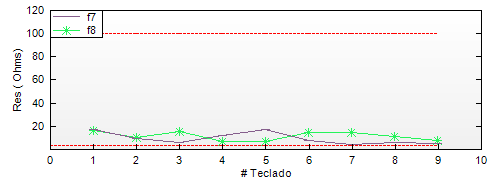
You can also view a graph of up to 20 Switches and Permanent Connections during testing by selecting "Show Graph"
from the "File" menu. The graph will show the values for the last 40 keypads tested and the allowable minimum and maximum for the first
item tested, either permanent connection or switch. You can zoom in and out using the scroll wheel. To pan, click and hold the scroll wheel
while dragging. Left click and drag to zoom in. Hold the mouse pointer over a date point to see the switch name and value.
Finishing The Job And Logging The Results
When you are finished testing the last Keypad ("Remaining" says "Done" if you entered
the number to test when you started the job), click on "End Job" instead of
"Test Next Keypad".
If you have not chosen to automatically save Job Logs (set in the Mistral Options window
File Locations tab),
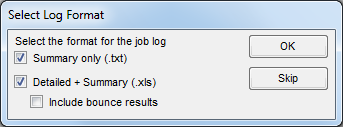
you will be asked to select the Job Log File format. You can create a summary
report or a detailed log that includes information on each part tested.
|
- Summary Only (.txt)
-
This Job Log is a summary of the job and results for each item in the Keypad File.
The file is standard text and can be opened with Notepad or Wordpad. An example is
shown below.
Engineering Solutions Inc.
Job #: 1111111
Lot Number: 2
Customer: Smith Manufacturing Inc.
Customer ID: 008723
Internal P/N: 445682
Internal Rev:
Customer P/N: 98234
Customer Rev: C
Keypad File: F:\Program Files\Mistral\Keypad Files\Smith Manufacturing\demo.skf
Operator: J. Smith
Assign S/N's: Yes
Auto increment by: 1
S/N failed keypads: Yes
First S/N: 80900001-A
Last S/N: 80900102-A
Job Started: 10/25/01 8:07:44 AM
Job Ended: 10/25/01 9:08:01 AM
Results
  Tested: 100
  Passed: 98
  Failed: 2 (2.0%)
Results By Item
  Permanent Connections
			Average
	Name	Resistance	Failed
	Perm.1	12 Ohms	   None
  LEDs
	Name	  Failed
	Fault	  None
	Low Batt  1 (1.0%)
	Test	  None
  Series LEDs
	Name	   Failed
	Red Bar	   1 (1.0%)
  Switches
		   Average
	Name   Resistance  Failed
	Start  197 Ohms	   None
	Stop   143 Ohms	   None
	Pause  167 Ohms	   None
- Detailed + Summary (.xls)
-
This Job Log format includes a summary of the job similar to the one above
plus details for each Keypad tested. The information is saved in a tab delimited
format for easy importing into a spreadsheet program such as Excel.
If you have measured the switch bounce at any time
while testing and you select the detailed report, you also have the option of
including the switch bounce values.
|
Select the format(s) you would like and click "OK" or click "Cancel" if you don't
want to create a Job Log File at this time.
If you clicked "OK" and selected one of the file formats, you will be
prompted to enter a name for each Job Log File. Enter a name and click "Ok" or
click "Cancel" if you do not want a log file for the Job.
As long as the Keypad File used for the job has not been closed and a new Job
has not been started, you can create a Job Log File for the last job. To do this
select "Save Last Job Log As..." from the "File" menu. You will again be
prompted for the Job Log File format and file name(s).
Even if you choose not to create a Jog Log file, a brief summary of the test is always added to the file
LOG.TXT located in the directory where the program was installed.
< | Help Index | >
< | Index de Ayuda | >
|
|
Pruebas de Producción
|
Modo de Prueba de Producción
Pruebas de producción te permite probar varios Teclados, grabando los resultados para cada parte. Para probar
Teclados necesitas estar en el modo Prueba Producción. Seleccione "Prueba Producción" bajo el menú
"Archivo".
Empezando un Nuevo Trabajo
Haciendo pruebas de Teclados es parte de un "trabajo". Cada trabajo tiene un número asociado con el, número de lote, operador
(la persona haciendo las pruebas) y la cantidad requerida de Teclados probados que son buenos.
Para empezar un trabajo, abra un Archivo Teclado mientras en el modo Prueba Producción. Para abrir un archivo haga
doble clic en el nobre del archivo en el navegador en el lado izquierdo de la ventana principal o seleccione "Abrir..." bajo
el menú "Archivo".
Tambien hay un "Abrir Especial..." bajo el menú "Archivo". Cuando uses este te da la opcion de abrir un archivo con todos los
LEDs convertidos a interruptores. Esto permite pruebas de circuitos de membrana antes de que sean instalados los LEDs. Nota que el
Archivo Teclado actual no es modificado. Los valores fijados en el tab Configuración Original
de la ventana Editar Info son usados para crear los interruptores.
Si un archivo ya está abierto, asegura que "Prueba Producción" está seleccionado bajo el menú "Archivo".
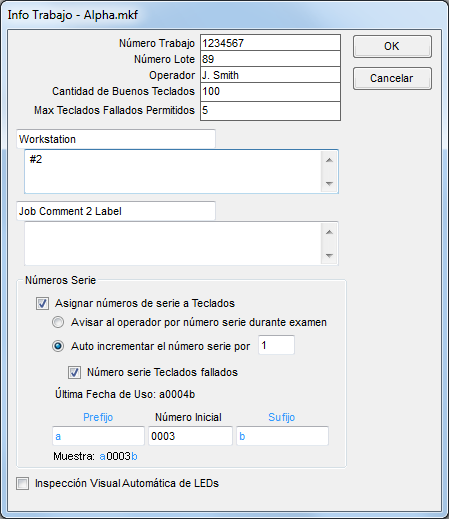
Con un Archivo Teclado abiero, haga clic el botón "Empieza Trabajo". La ventana Info Trabajo abrirá, aqui
es donde entras información sobre el trabajo que vas a comenzar.
|
- Número Trabajo, Número Lote y Operador
-
Estos campos son guardados como parte del log de trabajo. Los números de trabajo y lote son usados
para el nombre de los archivos de log de trabajo.
- Cantidad de Buenos Teclados
-
Entrando un número permite al Mistral a mostrar que tantos buenos Teclados necesistas durante la
prueba. El número de partes que pasan o fallan siempre son grabadas aunque no entres un número en
este campo.
- Max Teclados Fallados Permitidos
-
Entrando un número permite al Mistral a mostrar la cantidad de teclados fallados antes de terminar la
prueba. El número de partes que pasan o fallan siempre son grabadas aunque no entres un número en
este campo.
- Etiqueta de Comentario y Comentarios
-
Estos campos te permiten entrar comentarios que aparecen en los logs de trabajo. Estos campos
tambien son guardados en el Archivo Teclado cuando el trabajo es completado y van a estar
la siguiente vez que abres el archivo para pruebas. Use la etiqueta para identificar el contenido
del campo para comentarios o para avisar al operador para información necesaria en el comentario antes
de comenzar la prueba. Si dejas la etiqueta y el comntario en blanco, no aparecerán en los logs
de trabajo.
- Números Serie
-
Esta sección te permite especificar números de serie que aparecerán en el log de trabajo detallado.
El número de serie tambien se puede usar en una etiqueta si Imprimir Etriqueta es habilitada (vea
Etiquetas para más información). Si usas una etiqueta que muestra el número
de serie o una barra de códigos, debes seleccionar esta opción para continuar.
- Asignar números de seria a Teclados
-
Seleccione esto si gusta usar números de serie para grabar o etiquetas.
Cuando está seleccionado, los campos abajos se habilitan.
- Avisar al operador por número de serie durante examen
-
Si esta opcion está seleccionada, se le va a pedir al operador por el número
de serie antes de probar cada parte. Use este método si las partes probadas
ya tienen números de serie y no son probadas en secuencia. Tambien puede usar
esta opcion con un lector de código de barras para registrar el número de serie
en el software Mistral.
Nota: El
Prefijo y Sufijo aplican a esta opcion. Se pueden usar
si la mayor parte del número de serie es el mismo para todos
los Teclados. Vea abajo para más información.
- Auto incrementar el número de serie por X
-
Seleccione esta opcion si va a aplicar números de serie a los
Teclados durante la prueba o si los Teclados ya tienen números
de serie y van a ser probados en secuencia. Entre el número
para incrementar cada vez.
- Número serie Teclados fallados
-
Seleccione esto si los Teclados que fallan tambien necesitan tener su número de serie.
-
Prefijo, Número Inicial y Sufijo
-
Registre un Prefijo y/o Sufijo opcional para la secuencia del
número de serie. Estos son agregados al Número Inicial cuando auto
incrementando o cuando se le pide el número. Por ejemplo si está
probando partes con números de serie comenzando en "800-0001-A", use
"800-" para el Prefijo y "-A" para el Sufijo.
Para números de serie que son auto incrementados, registre el Número Inicial
al primer valor. En el ejemplo anterior esto sería "0001". Nota que los ceros
antecedentes son usados para asegurar que todos los números de serie tengan
el mismo número de dígitos. Usando nuestro ejemplo, el primer número de serie
es "800-0001-A" y el décimo número va a ser "800-0010-A".
-
Inspección Automática de LED
-
Vea Inspección Visual Automática de LEDs para más información..
|
Cuando termine con la ventana Info Trabajo haga clic en "OK" para comenzar el trabajo o "Cancelar" para parar.
Probando Teclados
Para probar una parte, conecte un Teclado al pod. Siempre debe estar conectado en la misma manera que el Archivo Teclado fue definido,
ya sea cuando fue aprendido automáticamente o creado manualmente.
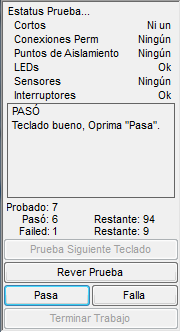
Haga clic "Prueba Primer Teclado" (o "Prueba Siguiente Teclado") para comenzar probando el teclado conectado.
Cada vez que un nuevo teclado es probado el Mistral empieza a escanear por cortos entre todos los puntos usados por
el Archivo Teclado, incluyendo puntos de aislamiento. El LED en el panel en frente parpadeará en rojo (o el LED derecho
se cambia a rojo si hay dos LEDs). Si se encuentra un corto el pod emite un sonido de frcuencia variable y el error
es mostrado.
Después de buscar por cortos el Mistral revisa las conexiones permanentes. Si una conexión permanente es buena,
el objeto de la conexión se cambia a verde. Si es mala el objeto se cambia a rojo y el pod emite un sonido de
frecuencia variable.
Si la opcion "Hacer prueba eléctrica continua de conexión permanente" es habilitada, el Mistral seguirá
probando eléctricamente las conexiones buenas hasta que hagas clic en el objeto de la conexión permanente
u oprimas la barra espaciadora. Si una conexión permanente falla durante esta prueba el objeto correspondiente
cambia a rojo.
Una vez que las conexiones permanentes son probadas el Mistral revisa los LEDs. Si un
LED no se encuentra o está instalado al revés, el objeto que corresponde al LED se cambia
a rojo.
El Mistral luego mide el voltaje delantero a traves de cada LED y muestra el resultado
en el objeto del LED. Si un voltaje es menos que el min o más alto que el max permitido,
el objeto del LED se cambia a rojo. Fuga de corriente reversa tambien es revisada en este
tiempo y si es muy alta el objeto cambia a rojo. Si cualquier de los LEDs es encontrado malo
el pod emite un sonido de frecuencia variable.
Si pruebas eléctricas continuas de LEDs es habilitada, el Mistral sigue probando los LEDs
eléctricamente hasta que hagas clic en el objeto del LED u oprima la barra espaciadora. Si
un LED falla durante esta prueba el objeto correspondiente cambia a rojo.
Si iluminación de LEDs es habilitado, los LEDs encontrados son iluminados una vez al tiempo o en
secuencia dependiendo en el modo de "Probando LED" (vea el tab Probando en
la ventana Editar Info para más información). Se le va a pedir haga clic en el objeto del LED para confirmar que
está iluminado.
Aviso: Si el archivo contiene LEDs serie, el operador
DEBE confirmar que los LEDs iluminan ya que el Mistral puede no ser capaz de
probarlos eléctricamente.
Un LED después de ser iluminado el objeto correspondiente cambia a verde.
Tip: Puedes oprimir la barra espaciadora para confirmar que un LED es iluminado.
Para fijar el orden que los LEDs son iluminados use la herramienta Fijar Secuencia de Prueba cuando
editando un archivo.
Si el teclado contiene sensores de luz, se le va a avisar al operador que cubra cada uno para
medir la corriente oscura. Cuando la corriente es abajo de la max corriente oscura se le va a
pedir al operador que descubra el sensor para medir la corriente de luz. Si el sensor no funciona
el operador puede oprimir "Esc" para pasarlo o hacer clic en el botón "Falla" para terminar la prueba.
Después de completar las pruebas de sensores, el LED en el panel de frente parpadeará rojo (o el LED derecho cambia a
verde o naranja si hay dos LEDs en el panel) y el Mistral comenzará a escanear por interruptores. Si "Interruptores
deben ser oprimidos en secuencia" es seleccionado, debe oprimir el interruptor correspondiendo al objeto
parpadeando de otra manera puede oprimir los interruptores en cualquier orden (vea la ventana Editar Info
para más información). Cuando oprimia cada interruptor en el Teclado el pod hace bip y el objeto
correspondiente cambia a amarillo (o rojo) y muestra la resistencia o el voltaje delantero para diodos
conmutados y LEDs conmutados. Cuando el interruptor es suelto el objeto correspondiente cambia
a verde si el interruptor es bueno o rojo si hay un problema. Puede oprimir el interruptor de
nuevo si no es requerido a oprimir interruptores en secuencia. Si está probando en secuencia, puede
oprimir la llave "Esc" para omitir un interruptor y después de que todos los interruptores han
sido probados una vez, la secuencia empieza de nuevo.
Tip: Para fijar la secuencia cuando haciendo pruebas de interruptores use la herramienta
Establece Secuencia de Prueba cuando editando un Archivo Teclado.
Para investigar por que un objeto es rojo, posicione el mouse sobre el objeto. Una caja aparecerá
detallando el problema.
Cuando todos los objetos han sido probados y verde haga clic el botón "Pasa". Si cualquier de los objetos
son rojos o encontró otra razón para fallar la parte aunque haya resultado buena (error con imprimir etc.),
tiene las opciones de correr la prueba de nuevo oprimiendo "Rever Prueba" o fallando el Teclado haciendo
clic en "Falla".
Tip: De nuevo puedes escoger
"Pasa" o "Falla" con la barra espaciadora dependiendo en si el Teclado es bueno o malo.
Si usted falla una parte, se le va a pedir entrar cualquier información adicional de que
fue mal. Esta información será guardada en el Log Detallado de Trabajo (vea abajo). Pueda ver
mensajes adicionales o se le pedirá una clave si Opciones Pasa/Falla
es seleccionado.
Tip: Si una clave no es requerida, puede despedir la ventana para comentarios por oprimiendo
la barra espaciadora.
Una vez que haya pasao o fallado un Teclado, desconectelo, conecte el siguiente Teclado para probar
y haga clic "Prueba Siguiente Teclado". Si gusta probar la misma parte otra vez oprima "Rever
Prueba". Tip: De nuevo, oprimiendo la barra espaciadora selecciona "Prueba Siguiente Teclado".
Durante pruebas un Trabajo Actual mostrando los resultados de los últimos 100 Teclados probados
pueden ser mostrados al fondo de la ventana por seleccionando "Muestra Trabajo Actual" bajo el menú "Archivo".

Tambien puede ver una gráfica hasta 20 Interruptores y Conexiones Permanentes durante pruebas seleccionando "Mostrar Gráfica"
bajo el menú Archivo. La gráfica mostrará los valores de los últimos 40 teclados probados y el máximo y mínimo valor admisible para el primer objeto
probado, o sea conexión permanente o interruptor. Puede ampliar o reducir usando la rueda de dsplazamiento. Para desplazar, haga clic la rueda en el mouse
y arrastre. Haga clic izquierdo y arrastre para ampliar. Hold the mouse pointer over a date point to see the switch name and value.
Terminando el Trabajo y Log de los Resultados
Cuando termines probando el último Teclado ("Restante" cambia a "Completo" si registraste el número
para probar cuando empezaste el trabajo), haga clic en "Terminar Trabajo" en lugar de "Prueba
Siguiente Teclado".
Si no escogió guardar los Logs de Trabajo automáticamente (fijado en la ventana Mistral Opciones en el tab
Ubicaciones de Archivos), se le pedirá seleccionar el formato para
el Log de Trabajo. Puede crear un sumario o un detallado log que incluye informació en cada parte probada.

|
- Sólo Sumario (.txt)
-
Este es un sumario del log de trabajo y los resultado para cada objeto en el Archivo Teclado.
El archivo es texto estandard y se puede abrir con Notepad o Wordpad. Un ejemplo es mostrado
abajo.
Engineering Solutions Inc.
Job #: 1111111
Lot Number: 2
Customer: Smith Manufacturing Inc.
Customer ID: 008723
Internal P/N: 445682
Internal Rev:
Customer P/N: 98234
Customer Rev: C
Keypad File: F:\Program Files\Mistral\Keypad Files\Smith Manufacturing\demo.skf
Operator: J. Smith
Assign S/N's: Yes
Auto increment by: 1
S/N failed keypads: Yes
First S/N: 80900001-A
Last S/N: 80900102-A
Job Started: 10/25/01 8:07:44 AM
Job Ended: 10/25/01 9:08:01 AM
Results
  Tested: 100
  Passed: 98
  Failed: 2 (2.0%)
Results By Item
  Permanent Connections
			Average
	Name	Resistance	Failed
	Perm.1	12 Ohms	   None
  LEDs
	Name	  Failed
	Fault	  None
	Low Batt  1 (1.0%)
	Test	  None
  Series LEDs
	Name	   Failed
	Red Bar	   1 (1.0%)
  Switches
		   Average
	Name   Resistance  Failed
	Start  197 Ohms	   None
	Stop   143 Ohms	   None
	Pause  167 Ohms	   None
- Detallado + Sumario (.xls)
-
Este formato incluye un sumario del trabajo similar al anterior más detalles
para cada Teclado probado. La información es guardada en un formato delimitado
con tabs para importar fácilmente en un programa como Excel.
Si midió el bote de interruptor durante la prueba y seleccionó
el reporte detallado, tambien tiene la opcion de incluir los valores de bote.
|
Seleccione el formato(s) que guste y haga clic "OK" o clic "Cancelar" si no quiere crear
un archivo de Log de Trabajo en este momento.
Si sleccionó "OK" y seleccionó uno de los formatos de archivo, se le va a pedir un nombre
para cada archivo de Log de Trabajo. Entre un nombre y haga clic "OK" o "Cancelar" si no quieres
un archivo log para el trabajo.
Mientras el Archivo Teclado usado para el trabajo no esté cerrado y no se ha comenzado un nuevo
trabajo, puede crear un archivo Log de Trabajo. Seleccione "Guardar Último Trabajo Como..." bajo el
menú "Archivo". De nuevo se le pedirá por el formato y nombre(s).
Aunque escoja no crear un log, un sumario corto de la prueba siempre es agregado al archivo LOG.TXT
ubicado en el directorio donde el programa fue instalado.
< | Index de Ayuda | >