< | Help Index | >

|
Labels |
Labeling Keypads
The Mistral can print labels for Keypads while testing when used with a label printer and appropriate Windows printer driver. The system is capable of storing multiple label designs called Label Layouts. Before beginning a job you select the label design you want to use from the "File" menu.
We recommended that you configure the printer before creating a Label Layout . Install the drivers as recommended by the manufacturer. Then select "Print Setup..." from the "File" menu. Choose the label printer you will be using and then click on the "Properties" button. Configure the printer as recommended by the manufacturer, making sure you set the print size to match the labels you will be using.
Creating A New Label Layout
New Label Layouts are created in the Mistral Options window. Select "Mistral Options..." from the "File" menu and click on the "Labeling" tab. Click on the "New" button beside the list of Label Layouts. A new Label Layout window will open. Note "Mistral Options..." menu item will not be available if there is an edit mode password and it was not entered when the program was launched or you are in the middle of testing Keypads.
Editing An Existing Label Layout
To edit an existing Label Layout open the Mistral Options window. Select "Mistral Options..." from the "File" menu and click on the "Labeling" tab. Select the name of the Label Layout you wish to edit from the list and click on the "Edit" button. Note "Mistral Options..." menu item will not be available if there is an edit mode password and it was not entered when the program was launched or you are in the middle of testing Keypads.
Defining The Label Layout
The Label Layout window contains the controls for defining how your label will look. The box on the right side of the window with rulers on the top and left is the Label Area. This area represents the actual label and is where you position the fields, text and lines that will make up your label.
At the top right of the window are the tools and controls for setting the font specifications and units.
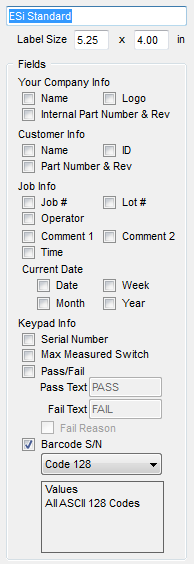
The box in the upper left corner contains the name of the Label Layout. This name will be used in the list in the Mistral Options window and when selecting a Label Layout for a job. Enter an appropriate name such as the name of the customer.
The size of the label is indicated in the two boxes below the label name. The default values will be the print area of the selected printer (unless the area is too large). You can change the size by entering new values in these boxes. To change the units, select from those available in the upper right corner of the Label Layout window.
A label can contain fields, text boxes and lines. Fields are areas where the actual text printed depends on data entered elsewhere, such as your company's name, or data that will be filled in while testing, such as the serial number. Text boxes contain text that will be the same for all jobs and Keypad. For example you might want to use a text box to have "P/N:" printed next to the field that contains the part number. Lines can be used to organize the label or create a border.
To add a field, click on the corresponding check box on the left side of the Label Layout window. The field will appear in the Label Area on the right side of the window. To move a field, select the Arrow tool and click and drag the field in the Label Area. To resize a field click on it and then click and drag on the drag box at the corner of the field outline. To remove a field, click on it with the Arrow tool and press the "Del" key or click on the field's check box to uncheck it.
You can change font, style and size of text in fields and text boxes. Select the field or text box you want to change using the Arrow tool and then use the font, style and size controls at the top of the window to modify how the text's appearance.
For the Pass/Fail field you can set the text that will appear on the label when the Keypad passes or fails. Be sure you've made the field large enough or the text may be truncated. Also remember that you can set whether labels are printed for Keypads that pass, for Keypads that fail or for all Keypads in the Mistral Options window.
If you would like to see why a Keypad failed, select the Fail Reason option. The Fail Reason will print in the same area as the Pass/Fail text. This information can take up a large amount of space so be sure to make the Pass/Fail field as big as possible. If you leave the Fail Text field blank, there will be more room to print the Fail Reason.
Selecting Barcode S/N will print the serial number as a barcode. You can choose from Codabar, Code 39, Code 128, Ean 8, Ean 13, ITF 14, GS1-128 and Yubin.
See Using The Tools below to find out how to add text and lines, print sample labels and view the label with sample data.
When you are finished defining the Label Layout, click "Save". The name of the layout will appear in the list in the Mistral Options window.
Using The Tools
 Select/Move
-
Use this tool to select something you want to move, edit or delete. To move a field, line or text box, click and drag with this tool or click on it and move using the arrow keys. To resize a field, use this tool to select it and then click and drag on the drag box at the corner of the box outlining the field. To delete a field, graphic, line or text select it and press the "Del" key.
 Add Graphic
-
You can add graphics to your label by selecting this tool and clicking where you would like the image to be placed in the Label Area. Select the graphic file using the dialog box that opens. Images can then be moved and resized using the arrow tool.
 Draw Line
-
To draw a line, select this tool and click at the point in the Label Area where you would like the line to start. A small "+" will appear. Then click at the point where you would like the line to end to finish the line. Lines are always made horizontal or vertical and snap to the nearest point on the grid.
 Add/Edit Text
-
Select this tool to add text to the label or to edit existing text. This can be used to add text that will be the same for all labels.
To add text, select this tool and click in the Label Area where you would like to add text. A small box with a cursor will appear. As you type the box will adjust to fit the text.
To edit existing text, select this tool and click in the box of the text you would like to edit
 Print Sample
-
Click this tool to print a sample of the label using the sample data.
 Show Sample Data
-
Click this button once to show sample data in the fields. Click it again to return to showing the field name.
Selecting A Label For A Job
To have labels print while testing, you must select the Label Layout for pass or fail. In the "File" menu, select the Label Layout in the "Print Label" submenu and then "Pass Label" or "Fail Label". To disable label printing, select "None" for the selected label.
< | Help Index | >
