< | Help Index | >

|
Getting Started
|
Software Basics
To launch the program, select "Mistral" from the "Mistral Keypad Test System" group located under "Programs"
when the "Start" button is pressed.
The program operates in three basic "modes", Production Test, Life Cycle Test and Edit Keypad File. Production Test
is used to run "jobs" consisting of testing a number of Keypads. Life Cycle Test is used to repeatedly test
a switch or switches on a single keypad, logging the results for each switch press. Edit Keypad File is what you use to
create and edit Keypad Files. The mode is selected in the "File" menu.
On startup the program will display a file browser on the left side of the screen that can be used to...
-
Organize Files - You can add folders by clicking on an existing folder and selecting "New
Folder" from the "File" menu (edit mode only).
Tip: Create a folder for each customer or product to help keep
track of the Keypad Files.
- Move Files and Folders - You can move files and folders by clicking and dragging them to a different folder.
- Rename Files and Folders - Click on the file or folder name and then type in a new name.
-
Get File Information - When a Keypad File is selected, the customer name and part number appear
at the bottom of the screen. If you would like more information, click on the file using the right
mouse button and select "Get Info..." from the pop-up menu.
- Open a Keypad File - Double click on a file to open it for testing or editing.
- Open other files - Double click on a file that is not a Keypad File and it will be opened using the appropriate program.
- Delete a file - Delete a file by right clicking on the file and selecting "Delete" from the pop-up menu.
Note that some of the above features require that the operator is allowed to edit files. See Mistral Options below.
Mistral Options
Select "Mistral Options..." from the "File" menu to open the Mistral Options window. Note this menu item
will not be available if there is an edit mode password and it was not entered when the program was launched
or you are in the middle of running a test.
The Mistral Options window is organized on four "tabs". Click on the name of the tab at the top of the
window to move to that tab.
|
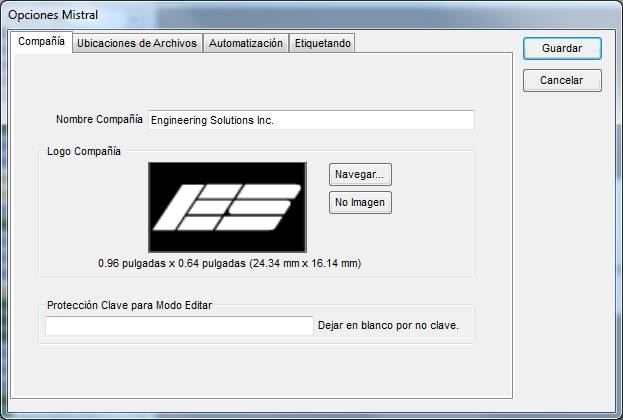
Company
This tab contains your company information and the edit password.

|
- Your Company Name
-
Enter your company name here. This will appear at the top of all test logs and can
be included on labels.
- Your Company Logo
-
Select a logo for use on labels here. The currently selected logo is displayed
on the left. Click "Browse..." to select a new file or "No Picture" if you do not want
to have a logo file. Logos can be JPEG (.jpg), GIF (.gif) or bitmap (.bmp) files. They will not be scaled on
the label so use an image of the appropriate size. When printing a label the program will
first look for the file in the location you specified. If the file is not found, a
copy of the original file selected will be used.
- Password Protection For Edit Mode
-
If this field is not blank, you will be required to enter a password the next time
the program is launched in order to be able to edit keypad files, create new files, delete,
move or rename files in the file browser or view the Mistral Options window. Use this
password to restrict the operator to testing only. You must exit the program and relaunch
it without entering the edit password for the restrictions to take effect.
Tip: You can
also password protect individual files. See Edit Info window
for more information.
The status bar at the bottom of the main screen indicates if editing is allowed.
 |
Editing allowed. |
 |
No editing allowed. |
|
|
|
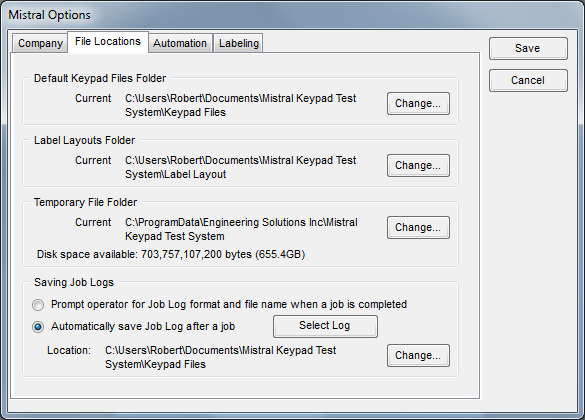
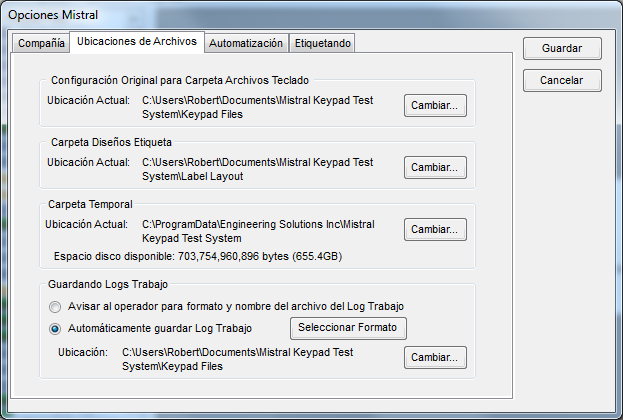
File Locations
This tab contains locations for various files used by Mistral and options
for how Job Logs are saved.
|
- Default Keypad Files Folder
-
This area shows the "root" folder for the file browser on the left side of the
screen. Click the "Change..." button to select a different folder. You can use this
feature to fill the file browser with Keypad Files stored on a common server.
- Label Layouts Folder
-
This is where the Mistral program looks for and saves Label Layout files. You don't
need to deal with these files directly; they will be created and deleted automatically as
you work with Label Layouts. If you would like to store your layout files on a common
server though, you can change the location where Mistral looks for layout files by clicking
the "Change..." button.
- Temporary File Folder
-
This is the location where temporary files will be stored while testing. Since these
files can be quite large, choose a location with at least 20 Megabytes of disk space
available. All temporary files are deleted when you exit the Mistral program.
- Saving Job Logs
-
This area contains options for how the Job Logs are saved when a
job is complete. Selecting the first option allows the operator to
choose where to save the logs and what format to save them in after each job
is complete.
If "Automatically save Job Log after a job" is selected the operator
will not be prompted to save the Job Logs. They will be saved in the
format and location specified here. You can choose the format of the
logs by clicking "Select Log Format..." and the location by clicking
"Change...". See
Finishing The Job And
Logging The Results
for information on log formats.
When log files
are saved automatically, the file name will be based on the Job Number
(entered in the Job Info window when a job is started), the keypad's
Part Number (set in the Edit Info window for the file) or the Keypad
File's name. Existing files will not be overwritten. If necessary, a
number will be added to the file name to make it unique.
|
|
|
Automation
The Mistral can accept input from external sources and provide feedback using a
digital I/O card installed in the computer or an external USB module. This tab is used to set how automation
is performed during testing. To find out more see
Automation.
|
|
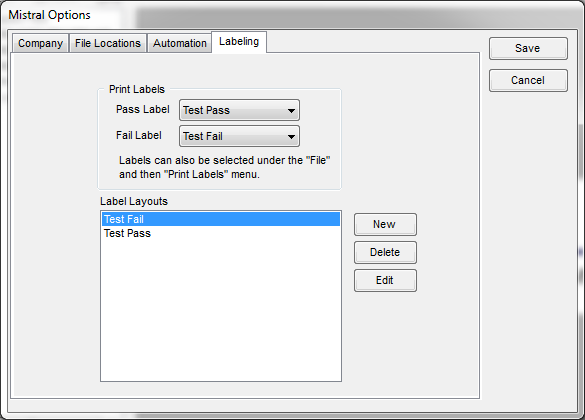
Labeling
This tab contains information for labeling keypads while testing.
|
- Print Labels
-
Select the label you would like to print when a test passes or fails. Selecting None will not print a label. This can also be set from the File menu.
- Label Layouts
-
The list box shows all the Label Layouts found in the directory specified on
the File Locations tab. To create a new file click "New". To delete a file, select the file from
the list and click "Delete". To edit an existing file, select the file from
the list and click "Edit".
For information on designing a Label Layout see Labels.
|
|
Connection Status Indicator
The status of the connection between the computer and pod is indicated in the lower left corner of the main
screen.
 |
Pod and computer are connected. |
 |
Computer could not connect to the pod. |
By placing the mouse pointer over the connection indicator you can get detailed information about
the pod version and number of test points.
If the unconnected symbol is displayed you can click on it to get the computer to try to connect to the pod.
Sound
By default the pod will beep to indicate key presses, LED illumination and whether a Keypad is
good or bad. You can toggle the pod sound on or off by selecting "Pod" from "Sound" in the "File"
menu or by clicking on the sound symbol in the status bar.
If your computer has a sound card and it is configured correctly, you can have the computer play
sounds in addition to or instead of the pod sounds. You toggle the computer sound on or off by
selecting "Computer" from "Sound" in the "File" menu or by clicking on the sound symbol in the status bar
with the right mouse button.
This menu item is not available if the program could not detect a valid sound card configuration.
You can change the sounds played when a good or bad Keypad is detected by placing WAV files name
"good.wav" or "bad.wav" respectively in the "Sounds" folder located where the program is installed.
The status bar at the bottom of the main screen indicates if sound is turned on or off.
 |
Pod and/or computer sound is on. |
 |
Pod and computer sound are off. |
By placing the mouse pointer over the sound indicator you can see which sound source is enabled.
< | Help Index | >
< | Index de Ayuda | >
|
|
Comenzando
|
Básicos del Software
Para lanzar el probrama, seleccione "Mistral" del grupo "Sistema para Prueba de Teclados Mistral" bajo "Programas"
cuando el botón "Start" es oprimido.
El programa opera en tres modos básicos, Prueba Producción, Prueba Ciclo de Vida y Editar Archivo Teclado. Prueba Producción
es usado para correr "trabajos" que consisten en probar un número de Teclados. Prueba Ciclo de Vida es usado para probar repetidamente un interruptor
o interruptores en un teclado, grabando los resultados en un log por cada interrupción. Editar Archivo Teclado es usado para crear y editar nuevos
Archivos Teclado. El modo es seleccionado en el menú "Archivo".
En comienzo el programa mostrará un navegador de archivos en el lado izquierdo que se puede usar para...
-
Organizar Archivos - Puede agregar carpetas haciendo clic en una existente carpeta y seleccionando "Nueva Carpeta"
en el menú "Archivo" (modo para editar solamente).
Tip: Crea una nueva carpeta para cada cliente o producto para mantener
los archivos organizados.
- Mueve Archivos y Carpetas - Puede mover archivos y carpetas haciendo clic y arrastrando a una carpeta diferente.
- Cambiar los nombres de Archivos y Carpetas - Haga clic en un archivo o carpeta y escriba un nombre nuevo.
-
Obtenga Información para Archivo - Cuando un Archivo Teclado es seleccionado, el nombre de cliente y
número de parte aparecen en el fondo de la pantalla. Si gusta más información, haga clic derecho en el archivo
y seleccione "Obtener Info..." en el menú.
- Abra un Archivo Teclado - Doble clic en un archivo para abrirlo para pruebas o editar.
- Abra otros archivos - Doble clic un archivo que no es Archivo Teclado y abrirá usando el programa apropiado.
- Borrar un archivo - Borre un archivo haciendo un clic derecho en el archivo y seleccionando "Borrar" en el menú.
Nota que unas de las características anteriormente requieren el el operador tenga permisos para modificar archivos. Vea Opciones Mistral abajo.
Opciones Mistral
Seleccione "Opciones Mistral..." en el menú "Archivo" para abrir la ventana de Opciones Mistral. Nota que este
objeto no será disponible si hay una clave para editar y no fue entrada cuando lanzó el programa o está
en medio de una prueba.
La ventana de Opciones Mistral está organizada en cuatro "tabs". Clic en el nombre del tab para seleccionar el tab.
|
Compañía
Este tab contiene la información de su compañía y la clave para editar.
|
- Nombre Compañía
-
Entre su nombre de compañía. Este aparecerá en la parte superior de todos los logs
de prueba y puede ser incluido en entiquetas.
- Logo Compañía
-
Seleccione un logo para uso en etiquetas. El logo seleccionado es mostrado en la izquierda.
Clic "Navegar..." para seleccionar un nuevo archo o "No Imagen" si no quiere usar una imagen.
Logos pueden ser JPEG (.jpg), GIF (.gif) o bitmap (.bmp). La escala no será cambiada y necesitará
usar una imagen de tamaño apropiado. Cuando imprimiendo una etiqueta el programa buscará primero en
la ubicación especificada. Si no se encuentra el archivo, una copia del archivo original se va usar.
- Protección con Clave para Modo Editar
-
Si este campo no es blanco, necesitará entrar una clave la siguiente vez que el
programa es lanzado para poder editar archivos teclado, crear nuevos archivos, borrar,
mover o cambiar el nombre o ver la ventana de Opciones Mistral. Use esta clave para restringir
al operador para solamente pruebas. Debe salir del programa y lanzar de nuevo sin entrar la
clave para que las restricciones tengen efecto.
Tip: También puede
proteger archivos individuales con clave. Vea Editar Info
para más información.
La barra de estatus en el fondo indica si es permisible editar.
|
Se permite editar. |
|
No se permite editar. |
|
|
|
Ubicaciones de Archivos
Este tab contiene las ubicaciones para varios archivos usados por Mistral y
opcioned de como los Log Trabajo son guardados.
|
- Configuración Original para Archivos Teclado
-
Esta área muestra la ubicación del navegador de archivos en el lado izquierdo de
la pantalla. Clic en "Cambiar..." para seleccionar un lugar diferente. Puede usar
esta característica para llenar el navegador de archivos con Archivos Teclado
guardados en un servidor común.
- Carpeta Diseños Etiqueta
-
Aquí es donde Mistral busca por y guarda archivos Diseño Etiqueta. No necesita
trabajar con estos archivos directamente; van a ser creados y borrados automáticamente
trabajando con Diseños Etiqueta. Si quiere guardar los archivos en un servidor común,
debe cambiar lar ubicación por oprimiendo "Cambiar...".
- Carpeta Temporal
-
Aquí es donde los archivos temporales son guardados durante pruebas. Estos archivos
pueden ser muy grandes, seleccione un lugar con 20 MB mínimo espacio disponible.
Todos los archivos temporales son borrados al salir.
- Guardando Logs Trabajo
-
Esta área contiene opciones de como guardar Logs Trabajo cuando un trabajo
ha terminado. Seleccionando la primer opción permite al operador a escoger
donde guardar los logs y que formato para guardarlos.
Si "Automáticamente guardar Log Trabajo" es seleccionado el operador no
será avisado para guardar los Logs Trabajo. Se guardarán en el formato
y ubicación especificado aquí. Puede escoger el formato del log haciendo
clic en "Seleccionar Formato" y la ubicación haciendo clic in "Cambiar...".
Vea
Terminando el Trabajo y
Grabando Resultados
para más información.
Cuando logs son guardados automáticamente, el nombre del archivo es basado
en el Número de Trabajo (entrado en la ventana Info Trabajo en el comienzo de
un trabajo), el número de parte del teclado (fijado en la ventana de Info para el
archivo) o el nombre del Archivo Teclado. Archivos existentes no serán cambiados.
Si necesario se le agregará un número.
|
|
|
Automatización
El Mistral puede acceptar input de fuentes externas y proveer feedback usando una
tarjeta I/O digital instalada en la computadora o un módulo USB externo. Este tab es usado
para fijar como automatización es ejecutada durante pruebas. Para encontrar más vea
Automatización.
|
|
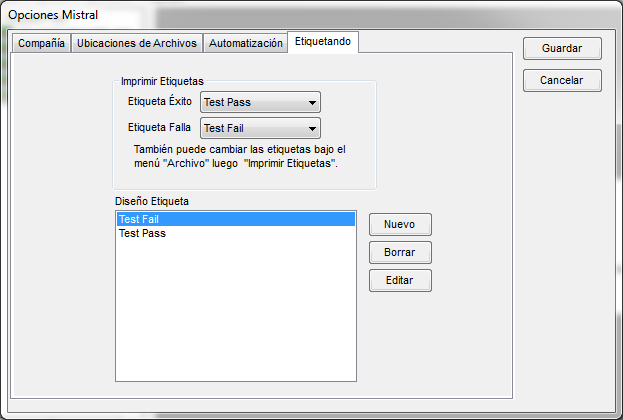
Etiquetado
Este tab contiene información para etiquetar teclados durante pruebas.
|
- Imprimir Etiquetas
-
Seleccione la etiqueta que guste imprimir cuando pasa o falla la prueba. Seleccionanco Ningún no imprime etiqueta. También puede hacer la selección bajo el menú Archivo.
- Diseño Etiqueta
-
La lista muestra todos los Diseño Etiqueta encontrados en el directorio especificado en
el tab Ubicaciones de Archivos. Para crear un nuevo archivo clic "Nuevo". Para borrar,
seleccione el archivo y clic "Borrar". Para editar un archivo, seleccione el archivo en
la lista y clic "Editar".
Para información en diseñando una Etiqueta vea Etiquetas.
|
|
Indicador de Estatus de Conexión
El estatus de la conexión etre la computadora y el pod es indicado en el fondo izquierdo the la ventana
principal.
|
Pod y computadora conectados. |
|
Computadora no puede conectar al pod. |
Moviendo el cursor sobre el indicador puede obtener información detallada sobre la versión del pod
y número de puntos de prueba.
Si el símbolo de falta de conexión es mostrado puede hace clic para tratar de reconectar.
Sonido
El pod produce un sonido para indicar una llave es oprimida, iluminación de LED y si un Teclado es
bueno o malo. Puede encender o apagar el sonido seleccionando "Pod" bajo Sonido en el menú "Archivo"
o haciendo clic en el símbolo de sonido en la barra de estatus.
Si su computadora tiene una tarjeta de sonido y está configurada correctamente, puede tener la
computadora tocar sonidos en adición o en lugar del pod. Puede encender o apagar el sonido en la
computadora seleccionando "Computadora" bajo "Sonido" en el menú "Archivo" o haciendo clic derecho
el símbolo de sonido en la barra de estatus.
Este menú no es disponible si el programa no detecta una tarjeta de sonido.
Puede cambiar los sonidos cuando un buen o mal Teclado es detectado poniendo archivos WAV con los
nombres "good.wav" o "bad.wav" respectivamente en la carpeta de "Sonidos" localizada donde el programa
fue instalado.
La barra de estatus en el fondo indica si el sonido está encendido o apagado.
|
Pod y/o computadora tienen sonido. |
|
Sonido apagado en el Pod y computadora. |
Moviendo el mouse sobre el indicador de sonido puede ver cual fuente está habilitada.
< | Index de Ayuda | >