Engineering Solutions Inc. · Renton, WA · (206) 241-9395 · Fax (206) 241-9411

Determining Which Type Of Omniguard You Have
There are a number of different Omniguard models discussed on this page. Here is how to tell which Omniguard you have.
If you have trouble viewing the manual, try right clicking on the link to download the file and then double click on the file on your computer to open.
Click on links below to view or download user's manuals for Omniguards and accessories. Adobe Acrobat Reader required.
|
Omniguard Cellular Manual - OG5cellwifiman.pdf (approx. 6M) for Omniguard Cellular with internal cell modem and WiFi Omniguard Cellular Manual - OG5cellman.pdf (approx. 6M) for Omniguard Cellular with internal cell modem Omniguard Manual - OG5man.pdf (approx. 6M) for Omniguards with color touch screens Omniguard Referencia R�pida - OG5ref_sp.pdf (approx. 127k) para Omniguards con pantallas t�ctiles en color Omniguard 4 Manual V1.30 - OG4dualusbman.pdf (approx. 500k) for Omniguards with two USB ports Omniguard 4 Manual - OG4man.pdf (approx. 321k) Omniguard III & IIIa Manual - OG3man.pdf (approx. 87k) Omniguard II & IIa Manual - OG2man.pdf (approx. 156k) Omniguard II Reference Sheet - OG2ref.pdf (approx. 29k) Omniguard MultiTech MultiModem GPRS User's Guide - OG5MultiTechMultiModemUG.pdf (approx. 112k) Omniguard MultiTech QuickCarrier USB-D User's Guide - OG5MultiTechQuickCarrierUG.pdf (approx. 112k) |
Unable to install / update drivers on Windows 10 or Windows 11
In Windows 10 / 11 a Vulnerable Driver Blocklist is enabled by default and can cause issues with Omniguard, Accessor and Mistral drivers.
With Admin privileges the driver block list can be disabled in Windows Security by opening "Windows Security" and selecting the "Device Security" tab.
Click on "Core isolation details" and then toggle off "Microsoft Vulnerable Driver Blocklist". If a prompt appears click "Yes" to approve. Visit the Omniguard Software Downloads page to get the latest driver version.
If you are unable to remove the obstruction through the paper outlet slot or the printer is really dirty then you will need to either dismantle the Omniguard to get to the obstruction, clean the printer, or send the unit in to ESi for repair. If the Omniguard is under warranty, dismantling it will void the warranty.
Printer Moves But Doesn't Print
All Omniguard printers use thermal paper. If the printer moves but doesn't print after changing the roll, the paper may not be thermal paper or the roll may not be installed correctly. Verify that the paper is feeding from the bottom of the roll and printing on the shiny side. If neither side is shiny, it's not thermal paper. Contact your Omniguard dealer or call Engineering Solutions at 206-241-9395 to order the correct paper.
There are a number of possible reasons the Omniguard is unable to properly read the amount of vacuum in your containment:
If an Omniguard II displays this message when turned on, the internal battery has probably failed. You can send the unit in for repair or replace the battery yourself.
To replace the battery, remove the four button screws on the bottom of the case and pull out the front panel which has the ciruit board attached. Remove the battery and take it to Radio Shack. They will be able to provide a suitable replacement. Install the new battery, replace the battery cover and re-install the front panel in the case using the four screws.
If the unit is an Omniguard II see the section for Paper Jam. If it is an Omniguard IIa, III, IIIa, 4 then the unit will need to be sent in for repair.
For all Omniguards, if any of the keys are unresponsive, the unit will need to be sent in for repair.
The Omniguard 4 can be monitored remotely by connecting an external modem to the serial port on the front panel. Almost any serial modem should work with the Omniguard 4 (a USB modem will not work). Modems with a speed of 14.4kbps or faster are recommended. We have had problems with the Motorola modems and can not recommend them for this application. The Practical Peripherals modems seem to work quite well and can be had for as little as $2 on eBay.
Can't Connect To Omniguard 4 Via Modem
The Omniguard 4 can be monitored remotely by connecting an external modem to the serial port on the front panel (a USB modem will not work). You should test the modem while you are at the job site.
If the modem test is successful but you are unable to connect when you use the Omniguard Communication software to call the Omniguard from your computer, there may be a problem with the computer's modem setup. First, make sure you've selected the correct COM port for the modem. Also make sure the phone number entered is correct. If these are correct, you may need to enter a new Modem Init String. Enter each of the strings below into the Modem Init String field in the Connect window and then press Ok to try it out.
AT&F&D0&K3
AT&F&D0&K3E1Q0V1
AT&FE1Q0V1+MS=V34
AT&F&D0&K3E1Q0V1+MS=V34
AT&F&D0&K3&Q5E1Q0V1+MS=V34
AT&F&C1&D2&K3E1Q0V1+MS=V34
If you are still experiencing problems please contact support.
Display Went Blank Or Became Garbled
If part or all of the Omniguard 4 display goes blank or the display becomes garbled, turning the unit off and then on again may temporarily fix the problem. Note that while the display may not look right, the unit is still monitoring and logging pressure correctly.
To prevent this problem, download and install the latest version of firmware from the Omniguard Software Downloads page.
For all other versions of Omniguard, the unit will need to be sent in to repair any display problems.
Clearing Job Logs Or Returning Unit To Factory Default
To erase all the Job Logs in an Omniguard 4, press the Start Job and Exit keys at the same time while the unit is turned on and showing pressure. You will be prompted to confirm that you want to erase the log. To confirm, again press the Start Job and Exit keys at the same time.
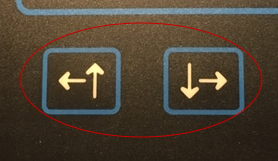
A key combination can also be used to erase all the Job Logs as well as return all settings (Alarm Setpoints, Log Rates, etc.) to factory default. With the unit turned off press the Start Job, Exit and down arrow keys at the same time. The unit will turn on and show "Factory Default" on the startup screen.
Setting Up Your Containment Site
Setting up a containment site can be a complex process and our support staff can not provide detailed design assistance. General information applicable to all Omniguards can be found in the back of the Omniguard 4 Manual. Engineering Solutions Inc. is not responsible for its accuracy nor conformance to specific regulations in your area.
Engineering Solutions Inc. advises all users to obtain the advice of qualified professionals, such as a Certified Industrial Hygienist. Visit the American Board of Industrial Hygiene site to locate a hygienist in your area. Many states also have certification programs for hygienist. Contact your state's occupational safety and health administration or visit the OSHA web site for more information.
Installing USB Drivers Under Windows Vista, 7 and 8
If your computer does not recognize the Omniguard when using Windows Vista, 7 or 8 or if the computer gives you an error when the Omniguard is connected, download and install the latest version of software from the Omniguard Software Downloads page. If after installing the latest software you are still having trouble, download the drivers, unzip the file and run "dpinst64.exe" or "dpinst32.exe".
Omniguard Does Not Connect To WiFi Adapter
If your Omniguard with color touchscreen will not connect to your Omniguard WiFi Adapter make sure you are using Omniguard firmware V8.5 or newer. You can download the latest version from the Omniguard Software Downloads page.
Omniguard WiFi Adapter Will Not Send Emails
Early in 2014 we changed our hosting provider. This resulted in a change to our mail server settings. If you are using the "Test" email settings for your Omnigaurd WiFi Adapters (which use our mail servers), your adapters may connect to your WiFi network but can not send emails (WiFi LED will be orange).
To fix this problem you will need to reprogram your WiFi adapters. Until an update to Omniguard Communications is available, you will need to manually change the "Outgoing Mail Server (SMTP)" from "smtp.engsolinc.com" to "mail.engsolinc.com" in your WiFi setup and then reprogram your WiFi adapters. When Omniguard Communications is updated, the "Outgoing Mail Server (SMTP)" will be set to the correct value automatically but you will still need to reprogram any WiFi adapters that were programmed using the old setting.
Internal Cell Modem Not Working
Omniguard Cellular units (distinguished by "OMNIGUARD CELLULAR" on the outside of the case and serial numbers beginning with "C50") have a built in cell modem that can be used to email notifications and daily logs. This feature is free for the first two years but you must register to activate it.
You also must have V9.2b2 or later firmware. Firmware can be updated by downloading the latest Omniguard Communications software from the Omniguard Software Downloads page.
Omniguards that have serial numbers after C503800 with V10.3b1 or earlier firmware will not be able to communicate without changing some additional settings. See Internal Cell Modem Or Internal WiFi Not Working below for more information.
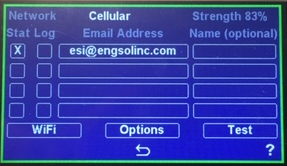
If you have activated your service and have the correct version of firmware, make sure you have set up the modem correctly. Touch the modem icon on the home screen. If there are any errors reported, fix those first. On the modem setup screen make sure you have entered the email addresses correctly and checked status and/or log for each one. On the options page make sure you have selected the status messages you would like to receive and set the log time correctly (it is 24 hour time). When everything is set up use the "Test" button to make sure it is working properly.
If only some email addresses are working or if an email address that once worked has stopped working, start by making sure the email address is shown correctly in the modem setup screen. Try sending an email to the address using a computer or cell phone to verify that it is working properly. If the address is okay the email from the Omniguard may be getting blocked by a spam filter. Check your junk mail folder to make sure the emails are not there and also make sure is not being blocked by adding it to your contact list. If you still can not receive emails on certain addresses, contact to see if the address is being blocked because the emails are being rejected by the server.
If your Omniguard Cellular unit has a serial number of C501000 to C503799, see End Of 2G Network Service for information.
Internal Cell Modem Or Internal WiFi Not Working
In December of 2019 we were required to make some changes to our server setup that prevent Omniguard Cellular units from initializing properly when turned on. (If the unit was already running when the change was made, the network communication may continue to work until the next time it is turned off.) This problem affects Omniguards with serial numbers after C503800 with V10.3b1 or earlier firmware. You can correct this issue by downloading the Omniguard Communications software and using it to install the latest firmware.
You can also fix the problem by making the following change on your Omniguard to manually set the server specifications.
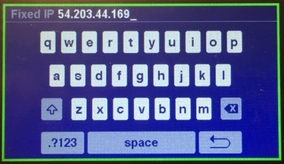

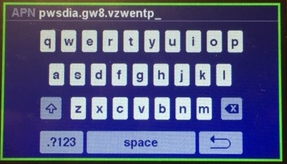
Your cell modem or WiFi should now be working. If you ever do a "Restore Factory Defaults" from the main menu, you will need to perform the above steps again.
Internal Cell Modem Is Not Sending Logs
Omniguard Cellular units (distinguished by "OMNIGUARD CELLULAR" on the outside of the case and serial numbers beginning with "C50") have a built in cell modem that can be used to email notifications and daily logs. This feature is free for the first two years but you must register to activate it.
If your Omniguard Cellular is not sending daily logs, first make sure that you have reliable cell service and the device is configured correctly. Touch the antenna icon on the Omniguard's home page. Make sure the cell modem is turned on and you have entered at least one email address and checked "Log" for that address. Then press the "Test" button and make sure you receive an email that says you will be getting logs. Press "Options" to see the time of day logs are sent.
If you receive the test email but still don't get logs, try turning your Omniguard off and back on. If that does not work you may need to reset the log in the Omniguard. Touch the pressure on the home screen and select "Erase Job Logs". Confirm you wish to clear the job log.
Unable To Register Omniguard Cellular
As of July 1, 2018 Verizon Wireless is no longer activating "2G" (CDMA) devices as part of their plan to discontinue the service. This affects Omniguards with the serial numbers C501000-C503799.
If you need remote communication capability and you own one of the affected Omniguard Cellular units but did not activate it by the deadline, please look at our accessories and supplies page for more information on the OG-Wireless, a external cellular wireless modem. We also have the OG-Dial, an autodialer that offers a remote communication option as well.
We apologize for any inconvenience but unfortunately we can no longer support this service for the affected Omniguard. If you have any questions please call Customer Support at 206-241-9395.
Verizon Wireless originally announced that they would shut down "2G" (CDMA) service at the end of 2019. They later extended support for existing devices until December 31, 2022. If you are using the network features of an original Omniguard Cellular unit with a serial number of C501000 to C503799, those features will likely stop working some time in 2023. You can continue to use your Omniguard for monitoring and logging pressure but it will no longer be able to send emails when 2G service is discontinued. If you own one of the affected units please look at our accessories and supplies page for other options or contact us at 206-241-9395 or
If you need to send your Omniguard in for repair you must get a Return Materials Authorization (RMA). You can fill out the RMA Request Form, call 206-241-9395 ext. 112 or email your complete contact information including address and phone number along with serial numbers of all units to be repaired to
The minimum repair charge for an Omniguard II, III or 4 is $50 plus shipping. Call for information on Omniguard I repair.
If you have questions about your Omniguard call tech support at 206-241-9395 ext. 112 or email